TUTORIAL
How to Connect Google Sheets to Stripe
By Felix Zumstein - Comments
Last updated on August 16, 2022
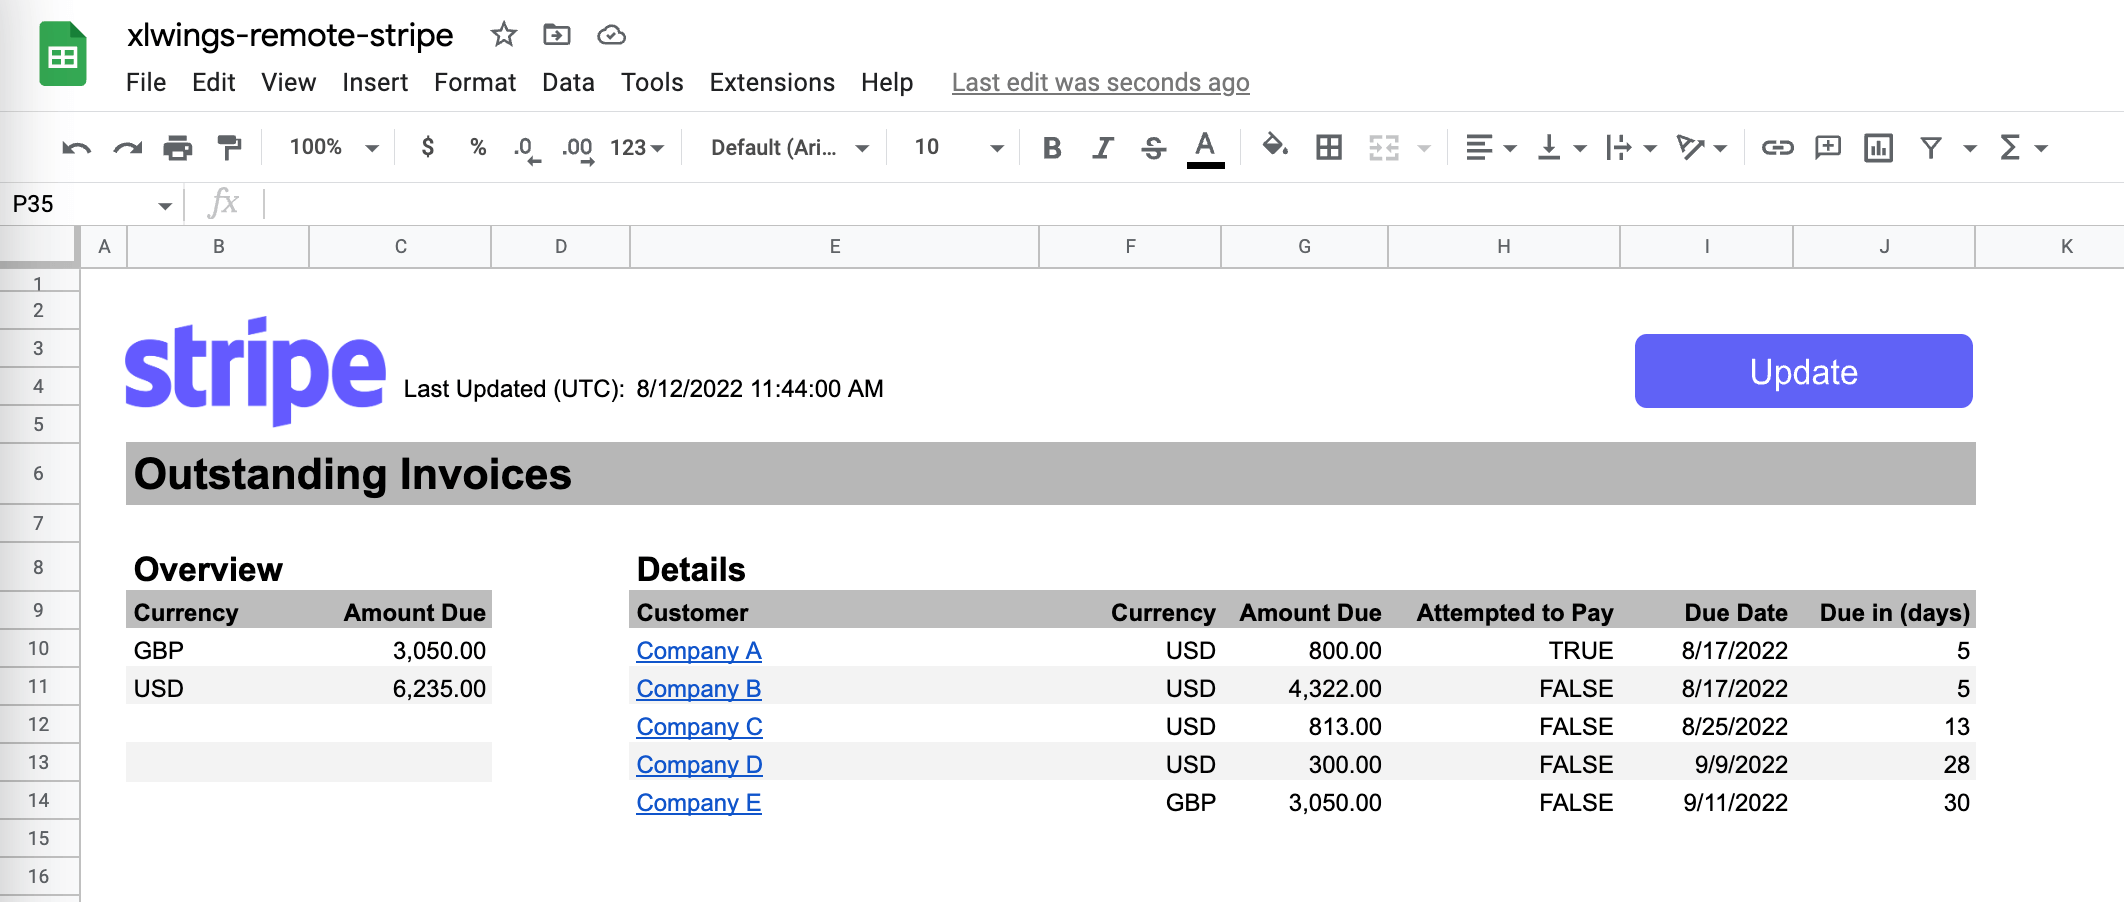
Like many business owners, I handle all my invoices via Stripe. Stripe’s dashboard greets you with a bunch of charts and numbers: USD Balance, Gross volume, successful payments, etc. However, one of the numbers I am most interested in is the volume of outstanding invoices. This number tells me how far off my booked revenues are from the actual revenues: one of the lessons you learn early on is that a dollar only counts once it’s in your bank account. So I click on Payments > Invoices > Outstanding: while this shows me every outstanding invoice, I need to sum them up in my head, which is not something I am very good at.
In this tutorial, we’re building our own Stripe Dashboard in Google Sheets where we can customize and analyze everything to our heart’s content. We’ll be doing this with Python and xlwings PRO (free for non-commercial use). As you can see from the screenshot, the dashboard shows a few details of the open invoices as well as the total amount per currency. At the end of the tutorial, we’ll see how we can update the dashboard both manually and automatically so that the numbers are always up-to-date when we come into the office in the morning.
Apart from being able to calculate the exact metrics we want, another big advantage of this approach is that we can give people in our Google workspace organization access to Stripe data without having to create a Stripe account for them: the principle of least privilege is a powerful one—especially in connection with money.
Looking for Microsoft Excel instead?
This dashboard is compatible with Excel on Windows, macOS, and the web, see the project’s README on GitHub.
Table of Contents
- Introduction
- Server quickstart
- Show me the code!
- Update the data automatically with Triggers
- xlwings vs. Google Sheets add-ons for Stripe
- Conclusion
Introduction
xlwings allows you to connect Google Sheets and Microsoft Excel with Python, from where you can access and process pretty much everything out there. In this tutorial, we’re going to make use of Stripe’s official Python package to fetch the data we need, then we’re creating a pandas DataFrame to be able to easily query and aggregate the numbers. To be able to communicate with Google Sheets, you need to use the xlwings remote interpreter, which is nothing else than a web service that you run on (some sort of) server or cloud instance. We’ll be using FastAPI as the web framework in this tutorial, but you could use any other framework including Django, Flask, etc. The server, often also called backend, will then be called from Google Sheets (the client or frontend) via the runPython function in Google Apps Script—we’ll get to all the details further below. However, let’s start with deploying a server for free in just a few minutes!
Server quickstart
To quickly spin up xlwings on a server, follow these steps:
- Head over to the project on GitHub: xlwings-remote-stripe
- Click the
Deploy to Renderbutton on the project’s README to spin up a free Render app (you can also fork the repo first on GitHub to be able to make changes to it). Instead of Render, you could also deploy the app to any service that can deal with Python or Docker. -
Fill in the following information on Render:
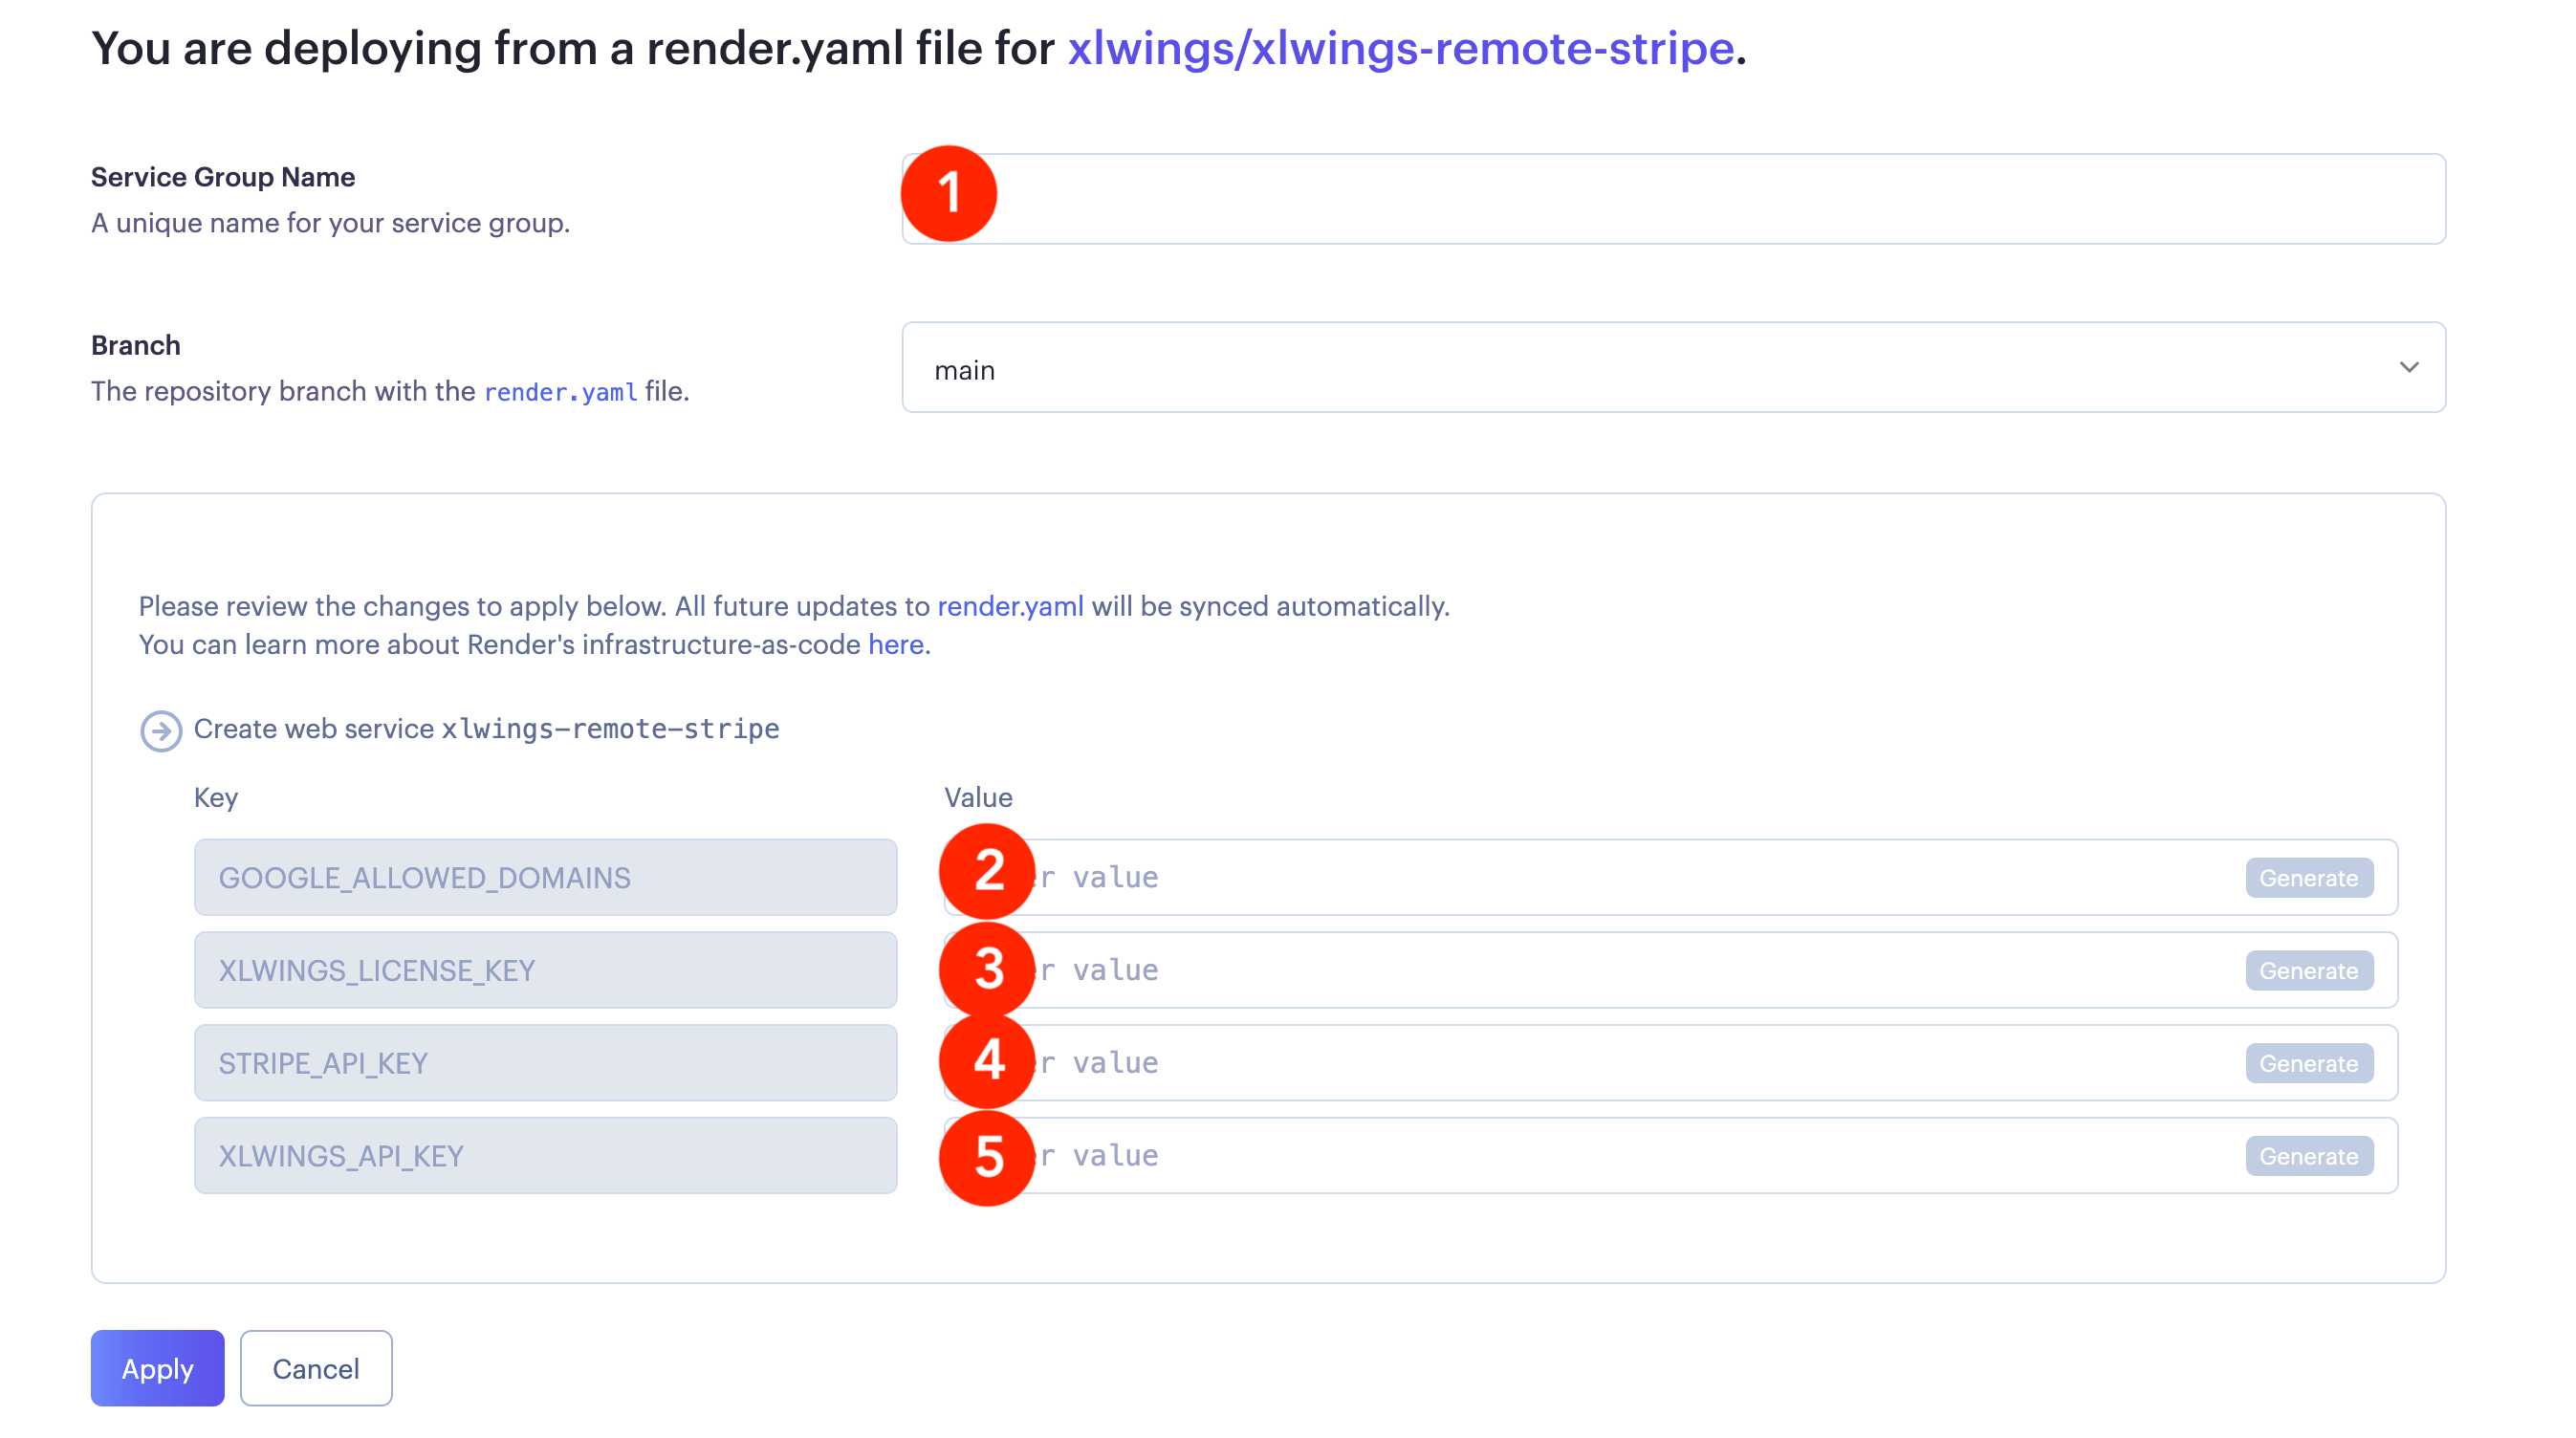 (1) A name, e.g.,
 xlwings-remote-stripe
(2) Your Google workspace domain(s) in the notation of a Python list:["your-domain.com"]or["your-first-domain.com", "your-other-domain.com"]. These are the Google workspace domains that will be granted access to the app.
(3) Your xlwings PRO license key (get your free trial key here). Note that xlwings PRO is free for non-commercial use, see the docs.
(4) Your Stripe API key: Paste aSecret keyorRestricted keyfrom Stripe: in Stripe, click onDeveloperson the top right, then selectAPI keyson the menu on the left. Now you have two options: either use theSecret keyunderStandard keys(click on+ Create secret keyif you don’t see one), which will give you access to everything or click on+ Create restricted key: this allows you to only give the key the permissions it needs, which is usually a good idea. For this tutorial, we’re going to use a restricted key with only theInvoicespermissions set toRead. This will give you a token starting withrk_live. You can also switch toTest modein Stripe, which will give you access to the test data only. In this case, the token will start withrk_test.
(5) The xlwings API key will only be required if you want to create the dashboard in Microsoft Excel, so leave this empty.After hitting
Apply, it will take a minute or two until your app is up and running. Check the progress on Render’s Dashboard (click on the Render logo on the top-left to get there). - Create a copy of the Google Sheet template by clicking on
Use Templateat the top right. - In Google Sheets, open the Apps Script editor by going to
Extensions>Apps Script, then paste in the URL of your Render app (you’ll find it when clicking on your project on the Render Dashboard, at the top of the page). -
In Google Sheets, click the
Updatebutton to query Stripe for your open invoices.Note: when you run this the very first time, the script will ask for the required permissions, which you will need to confirm. Once confirmed, click the button again.
Now that the server is up and running, let’s have a look at what happens behind the scenes and how you can change the Stripe query.
Show me the code!
The sample app is a simple FastAPI web app and the whole magic happens in the dashboard endpoint under app/api/stripe_api.py (check the repo for the full code including imports):
@router.post("/dashboard")
def dashboard(data: dict = Body, current_user: User = Security(authenticate)):
    # Spreadsheet objects
    book = xw.Book(json=data)
    sheet = book.sheets["Dashboard"]
    overview_cell = sheet["overview"]
    details_cell = sheet["details"]

    # Clear existing data
    overview_cell.expand().clear_contents()
    details_cell.expand().clear_contents()

    # Query Stripe for outstanding invoices
    logger.info(f"Running stripe query for {current_user.email}")
    stripe.api_key = settings.stripe_api_key
    invoices = stripe.Invoice.list(status="open", limit=100)

    if not invoices.data:
        sheet["overview"].offset(row_offset=1).value = "N/A"
        sheet["details"].offset(row_offset=1).value = "N/A"
        return book.json()

    # Get all invoices from the paginated Stripe response as DataFrame
    data = []
    for invoice in invoices.auto_paging_iter():
        data.append(invoice)
    invoices = pd.DataFrame(data)

    # Data cleaning/wrangling
    invoices = invoices[
        [
            "id",
            "customer_name",
            "currency",
            "amount_due",
            "attempted",
            "due_date",
        ]
    ]
    invoices = invoices.sort_values("due_date")
    invoices = invoices.set_index("id")
    invoices["due_date"] = pd.to_datetime(invoices["due_date"], unit="s").dt.date
    invoices["Due in (days)"] = (invoices["due_date"] - dt.date.today()).dt.days
    invoices["amount_due"] /= 100
    invoices["customer_name"] = (
        '=HYPERLINK("'
        + "https://dashboard.stripe.com/invoices/"
        + invoices.index
        + '", "'
        + invoices["customer_name"]
        + '")'
    )
    invoices["currency"] = invoices["currency"].str.upper()

    invoices = invoices.rename(
        columns={
            "currency": "Currency",
            "amount_due": "Amount Due",
            "customer_name": "Customer",
            "attempted": "Attempted to Pay",
            "due_date": "Due Date",
        }
    )

    invoices_overview = invoices[["Currency", "Amount Due"]].groupby("Currency").sum()

    # Write results to the sheet
    overview_cell.value = invoices_overview
    details_cell.options(index=False).value = invoices
    sheet["last_updated"].value = dt.datetime.now(dt.timezone.utc)

    return book.json()
Note: while the repo uses FastAPI, you can use xlwings with any other Python web framework, including Django, Flask, etc.
As you can see from the snippet, xlwings makes it easy to interact with Google Sheets to clean ranges or write DataFrames to cells.
To call this endpoint, the Update button on Google Sheets is linked to the updateStripeDashboard function, which uses runPython (you will find the respective code by going to Extensions > Apps Script):
const baseUrl = "https://your-url.com";
const token = ScriptApp.getOAuthToken();

function updateStripeDashboard() {
  runPython(baseUrl + "/stripe/dashboard", { apiKey: token });
}
runPython is a function of the xlwings Apps Script module, which is already present in the template of this tutorial. If you would start from scratch with a new Google Sheet, you can copy/paste the xlwings module by running xlwings copy gs on a machine where you have Python and xlwings installed.
While clicking the button works great to get the latest update at any point in time, it’s probably a good idea to refresh the query automatically so it’s already up-to-date when you come into the office early in the morning. The next section shows you how it’s done.
Update the data automatically with Triggers
Google Sheets has a built-in scheduler called Trigger: go to Extensions > Apps Script, then click on the alarm clock icon on the left side to open Triggers.
At the bottom right, click + Add Trigger and select the values as shown in the screenshot to run the code every morning:
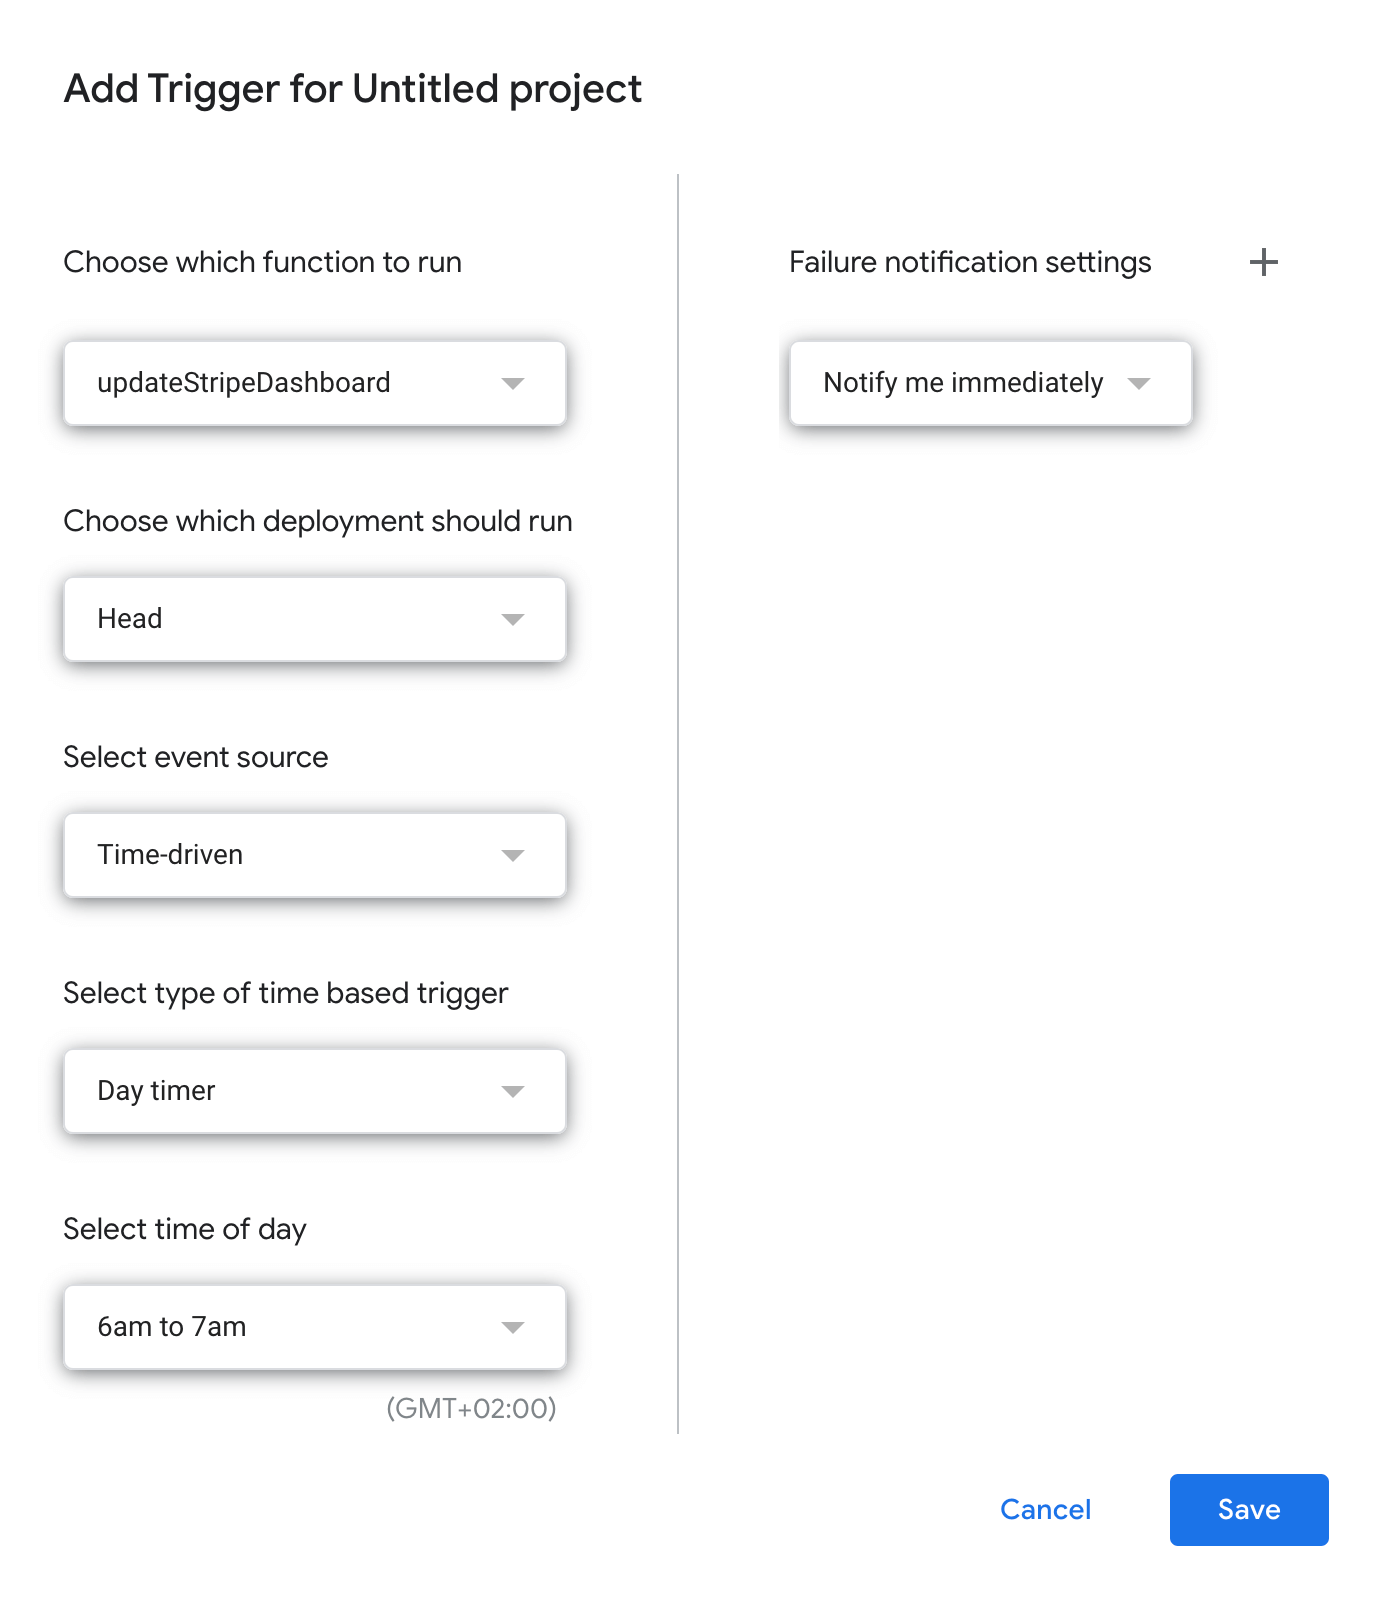
Once you hit Save, you will see your scheduled run in the list of Triggers, from where you can edit it and see previous executions. You’ll also be able to the errors in case your function doesn’t run properly.
But why is it a good idea to use Python to connect to your Stripe data and how does it compare to using an off-the-shelf Google Sheets add-on? The next section gives you a few answers.
xlwings vs. Google Sheets add-ons for Stripe
By using a custom Python backend, you get a few advantages compared to off-the-shelf (“no-code”) Google Sheets add-ons:
- No need to trust a third-party vendor with your sensitive data: you can run the query on your desired infrastructure (Render is just an example of how to deploy it). You can choose the provider and location—you can even run it on a physical company server or a Raspberry Pi.
- Google add-ons are usually priced per user, which can get expensive very quickly. xlwings PRO only requires a paid license for developers and is free to use for end-users.
- You can keep the Stripe API key and other sensitive data out of your Google Sheets—they can be properly secured as secrets on the server side and can’t be accessed by spreadsheet users.
- You can use a really powerful server if you want to do some CPU or memory-intense stuff besides querying Stripe.
- You get access to the user who runs the query and you can log whenever someone executes a query.
- You can easily make a few queries read-only for certain users while giving other users write access. For more info about authorization, see https://github.com/xlwings/xlwings-googlesheets-auth.
- You can use the whole spreadsheet to design your very own user interface rather than having to follow the design of the no-code solution (“the data will always be written to cell A1” is a common no-code restriction).
- If you have other data sources that you need to pull in and combine with the Stripe results, you can do this easily, as it’s just Python code.
Conclusion
xlwings allows you to automate Google Sheets by using Python instead of Google Apps Script (i.e., JavaScript). Since Python can connect to virtually any data source, a connection to Stripe is just a few lines of code away. This means you can analyze and show the data exactly the way you want, with the tools you always use. Want to add a Matplotlib plot? Yes, that’s supported also—watch out for a separate tutorial!