TUTORIAL
How to write xlwings code that works both with a local Python installation and via remote interpreter
By Felix Zumstein - Comments
Last updated on August 8, 2022
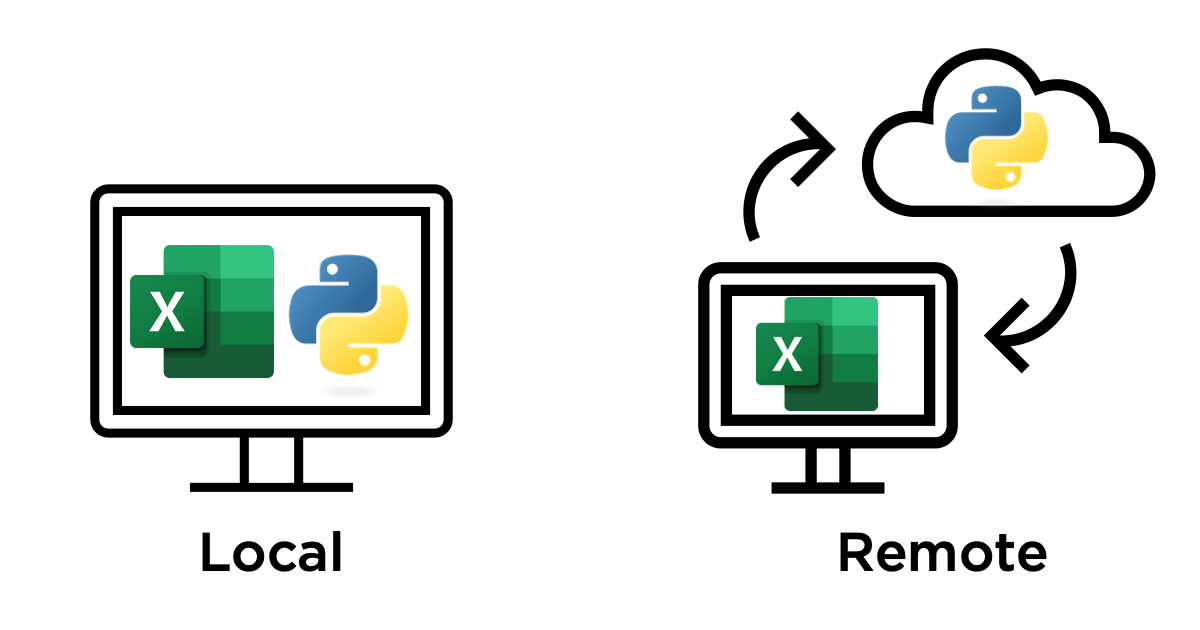
Using xlwings with a local installation of Python makes it easy to get started, while working with the new remote interpreter may be a little harder to get started, but eventually saves you from deployment headaches. The remote interpreter also allows you to use xlwings with Docker and WSL (Windows Subsystem for Linux).
To let the end-user choose whether they want to install Python locally, use a Docker container, or your centrally hosted web service, you’ll need to prepare your code accordingly. In this tutorial, we’re learning how it’s done.
Table of Contents
Local Python installation vs. Remote Interpreter
In the not so distant past, xlwings only worked with Desktop Excel on macOS and Windows. On Windows, xlwings uses COM technology via the pywin32 package to automate Excel, while on macOS, it uses Apple Script via the appscript package. That’s fine, as long as you’re developing on your own computer, but as soon as you want your (less technical) co-workers or clients to use your tool, installing Python and all the dependencies for your tool can become an issue.
The new xlwings remote interpreter allows you to create a server-based Python web service that works with the familiar xlwings syntax, but really uses the spreadsheet as the frontend in place of a web page in your browser. This has lots of advantages, e.g.:
- xlwings now works on Linux, Docker, and WSL
- You can deploy the Python part centrally on a server or serverless function
- No local installation of Python and its dependencies required
The xlwings quickstart command uses the FastAPI web framework, but you could use any other framework such as Django or Flask if you prefer.
How to write compatible code
Let’s start by running the quickstart command with the --fastapi flag in a Terminal or Command Prompt (feel free to replace myproject with another name). This creates a minimal project that can be used with the remote interpreter:
xlwings quickstart myproject --fastapi
This will create a folder myproject in your current working directory with a few files:
myproject
├─ app.py
├─ main.py
├─ myproject.xlsm
└─ requirements.txt
Open the file main.py in your favorite editor or IDE:
# main.py
from fastapi import Body
import xlwings as xw

from app import app


@app.post("/hello")
def hello(data: dict = Body):
    # Instantiate a Book object with the deserialized request body
    book = xw.Book(json=data)

    # Use xlwings as usual
    sheet = book.sheets[0]
    if sheet["A1"].value == "Hello xlwings!":
        sheet["A1"].value = "Bye xlwings!"
    else:
        sheet["A1"].value = "Hello xlwings!"

    # Pass the following back as the response
    return book.json()


if __name__ == "__main__":
    import uvicorn

    uvicorn.run("main:app", host="127.0.0.1", port=8000, reload=True)
To make our hello function usable via the classic RunPython function in VBA as well as the new RunRemotePython function (or the runPython functions in Excel on the web or Google Sheets), let’s do the following changes:
- Rename the current
hellofunction intohello_remoteto handle theRunRemotePythoncall - Factor out the core functionality into the new
hellofunction - Add a function
hello_localto handle the classic xlwingsRunPythoncall
With all the changes done, main.py looks like this:
from fastapi import Body
import xlwings as xw

from app import app

def hello(book):
    sheet = book.sheets[0]
    if sheet["A1"].value == "Hello xlwings!":
        sheet["A1"].value = "Bye xlwings!"
    else:
        sheet["A1"].value = "Hello xlwings!"


def hello_local():
    book = xw.Book.caller()
    hello(book)


@app.post("/hello")
def hello_remote(data: dict = Body):
    book = xw.Book(json=data)
    hello(book)
    return book.json()


if __name__ == "__main__":
    import uvicorn

    uvicorn.run("main:app", host="127.0.0.1", port=8000, reload=True)
Now open myproject.xlsm and go to the VBA editor by hitting Alt+F11. In Module1, you’ll want to change the SampleCall to read as follows:
Sub SampleCall()
    RunPython "import main;main.hello_local()"
End Sub

Sub SampleRemoteCall()
    RunRemotePython "http://127.0.0.1:8000/hello", apiKey:="DEVELOPMENT"
End Sub
That’s it! You can now run SampleCall (e.g., by clicking into it and hitting F5), which will use a local installation of Python. If you want to use the remote interpreter, you’ll first have to start the Python server in a Terminal/Command prompt (note that this expects you to have the dependencies installed from requirements.txt):
python main.py
Instead of running the server from the Terminal, you could also run the script via the respective functionality of your editor or IDE. Once the server is running, you can call SampleRemoteCall from the VBA editor (or assign a button to it on one of your worksheets).
While the quickstart command has set up SampleRemoteCall to work with a Python web service on your localhost, the idea here is to eventually deploy it to some sort of a server (cloud function, etc.) so that the users of your spreadsheet tools don’t have to install Python on their system. Providing them with a Docker image would be another option.
Further information
For more information about the remote interpreter, see the docs.